Recently, I purchased a cheap Intel Atom-based Windows 8 tablet (the DigiLand DL801W) that was being sold at a very low price ($15 USD, although the shipping to Canada negated much of the savings) because it would not boot into Windows – rather, it would only boot into the UEFI shell and cannot be interacted with without an external USB keyboard/mouse.
The patient, er, tablet
The tablet in question is a DigiLand DL801W (identified as a Lightcomm DL801W in the UEFI/BIOS data). It uses an Intel Atom Z3735F – a 1.33GHz quad-core tablet SoC (system-on-chip), 16GB of eMMC storage and a paltry 1GB of DDR3L-1333 SDRAM. It sports a 4500 mAh single-cell Li-ion battery, an 8″ 800×1200 display, 802.11b/g/n Wi-Fi using an SDIO chipset, two cameras, one microphone, mono speaker, stereo headphone jack and a single micro-USB port with USB On-The-Go support (this allows the port to act as a USB host port, allowing connections with standard USB devices like keyboards, mice, and USB drives).
Step 1: Triage & troubleshooting
The first step was to power on the tablet to get an initial glimpse into the issues preventing the tablet from booting. I was able to confirm that the eMMC was detected, but did not appear to have any valid MBR or file system; therefore, the UEFI firmware defaulted to entering the UEFI shell (which was of little use on its own as there is no on-screen keyboard available for it).
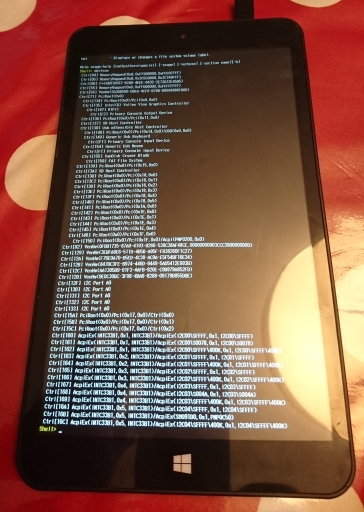
DigiLand DL801W with UEFI shell
However, one can immediately notice there is an issue with the shell: how do you enter commands without an on-screen keyboard? The solution was to use a USB OTG (On-The-Go) dongle to convert the micro-USB type B port into a USB type A host port.
Using the shell commands, I tried reading the contents of the boot sector, which should end with an MBR signature of 0x55AA. Instead, the eMMC returned some nonsensical data: the first half of the sector had a repeating byte pattern of 0x10000700, and the second half was all zeroes (0x00) except the last 16 bytes which were all ones (0xFF). The kicker was that this data was returned for every sector I tried to read. No wonder the eMMC was unbootable – the eMMC had suffered logical damage and the firmware was not functioning correctly.
After creating a 32-bit Windows 10 setup USB drive (these cheap low-RAM PCs often use a 32-bit UEFI despite having a 64-bit capable CPU), I opened Hard Disk Sentinel to take a deeper look at the condition of the onboard eMMC.

Malfunctioning Foresee 16GB eMMC visible in Hard Disk Sentinel
The eMMC identified itself with a vendor ID of 0x65, and an MMC name of “M”. It reported a capacity of 7.2 GB instead of the normal 16 GB, another sign that the eMMC was corrupted at the firmware level.

Foresee 16GB eMMC returning corrupted data
Using HDS, I performed a read scan of the entire eMMC despite its failed condition. The read speeds were mostly consistent, staying between 40 to 43 MB/s. A random read test revealed a consistent latency of 0.22 ms.
In order to assess whether the eMMC was writable in its current state, I ran a zero-fill and subsequent read scan. The eMMC appeared to accept writes but did not actually commit them, as HDS threw verification errors for all sectors.
After the tests in HDS, I decided to attempt an installation onto the eMMC to assess its writability. Windows Setup failed to create the disk partition structures, throwing an error message reading “We couldn’t create a new partition or locate an existing one”.
Step 2: Teardown & eMMC replacement
Since the onboard Foresee NCEMBS99-16G eMMC module was conclusively determined to be faulty, there was no point keeping it on the tablet’s motherboard. This also provided an opportunity to upgrade the eMMC to a a larger and faster one. Since this required the tablet to be disassembled, I decided to do a teardown of the tablet before attempting to replace the failed eMMC module (the teardown will be in a separate blog post when the time comes).
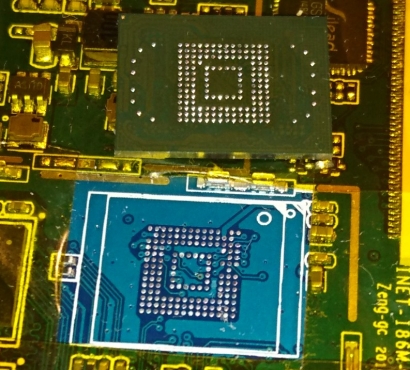
After removing the insulating plastic tape on the bottom of the PCB, I masked off the eMMC with some kapton tape to protect the other components and connectors from the heat of my hot-air rework station. With some hot air and patience, the failed Foresee eMMC was gone. This also revealed that the eMMC footprint supported both the 11.5×13 mm and 12×16 mm sizes, but the 12×16 mm footprint did not have the extra 16 solder balls for reinforcement (most eMMC balls are unused so their omission had no negative functional effect).
Foresee eMMC removed from DL801W’s motherboard
Instead of a barely-usable 16 GB of eMMC storage, I opted to use the Samsung KLMBG4GEND-B031 – a 32 GB eMMC 5.0 module. This chip boasts more than 2000 IOPS for 4K random I/O, which should be a boon for OS and application responsiveness.

Replacement Samsung KLMBG4GEND-B031 eMMC installed
A little flux and hot air was all I needed to give the 32 GB eMMC a new home. Time to reassemble the tablet and try installing Windows 10 again.
Step 3: OS reinstallation
After spending a few minutes cleaning the board and reinstalling it in the tablet, it was time to power the tablet back on, confirm the presence of the new eMMC and reattempt installing Windows.

Installing Windows 10 from USB drive via USB-OTG adapter
The eMMC replacement proved to be successful; within minutes, I was off to the races with a clean installation of Windows 10.
Conclusion

DL801W restored, running Texas Instruments’ bqSTUDIO software
This was a pretty fun project. With some electronics and computer troubleshooting skills, I had a tablet capable of running desktop Windows programs. Its low power consumption and USB host capabilities made for a great platform to run my Texas Instruments battery hardware and software without being tethered to my desktop.
However, I was not finished with this tablet. The 1 GB of onboard RAM made Windows painfully slow to use, as the CPU was constantly bogged down performing memory compression/decompression. The 32GB of eMMC storage I initially installed began feeling cramped, so I moved to a roomier 64GB (then 128GB) eMMC.
I won’t go into the details of how I upgraded the RAM in this post, as it’s a long story; simply put, soldering the RAM ICs was the easy part.

Pingback: Hot Air Surgery Revives a Cheap Windows Tablet | Hackaday
I am waiting for the next part !
Good work
LikeLike
Great Hack!
I’ve been waiting for someone to post information about how to swap out these chips on the Internet. DIYer’s in Shenzhen have been upgrading 16GB iPhones to 128GB using hot-air rework for 18+ months already.
This knowledge can be applied to Chromebooks and bargain-bin Windows laptops which often ship with tiny amounts of eMMC storage memory – only 16 or 32 GB. These devices don’t even have enough free space to perform a full Windows update. A Cherry Trail or older device can be upgraded and a stripped down Linux variant like Mint or Gallium can be installed making a very good, cheap device for browsing, coding, and document publishing. Plenty of non-upgradable laptops can be given a few more years of life with little risk.
I’m actually more interested in the RAM upgrade; using a laptop with only 2 GB of RAM with any OS is torture.
LikeLike
The 16GB-equipped Windows devices shouldn’t even be a thing in my opinion. The only way they managed to pack Windows 8/8.1 into such a cramped space is with a method called “WIMBoot”, which uses the recovery partition’s data for normal Windows operations, overlaying the rest of the file system on top to look like a normal Windows installation. Windows 10 appears to have removed this feature in favour of adaptive file compression, but it makes in-place upgrades on space-constrained devices nearly impossible. (https://blogs.windows.com/windowsexperience/2015/03/16/how-windows-10-achieves-its-compact-footprint/)
That said, it would be interesting trying to install a Linux OS on a tablet SoC like this and seeing how well it can act as a (wireless) router, compared to a standalone device – I’d find it amusing if the x86 cores in the SoC outperform the MIPS32/64 cores found in consumer network equipment!
Given how unserviceable these devices are, eMMC replacement is by far the easiest upgrade to perform. The RAM upgrade required digging into how UEFI works (and I still don’t quite get it), and part of the reason I succeeded at all is because I was able to “steal” data from BIOS images meant for similar devices, but sold by other companies.
LikeLike
Hey there, awesome hack!
Can you give me some advice? I’m at loss right now, my windows tablet (Vulcan XB) is stuck at EFI shell with no usb support, I mean, the OTG doesn’t link usb keyboard and tablet so I’m not able to type a thing in the shell. How did you do it?
LikeLike
Are you using a USB OTG dongle with the correct ID pin connection (the 4th microUSB pin, ID, needs to be shorted to ground to enable host mode)? Also, are you using a wireless or wired keyboard?
Looking at pictures online, this tablet should have a keyboard. Does yours not have the keyboard (or does it just not work)?
LikeLike
Fantastic blog and post, I recently had my iphone storage chip upgraded (living in China currently). Very interested in the RAM Upgrade post, looking forward to it!
LikeLike
great job ! thank you for sharing
mi tablet is showing similar problems ( mediacom w911)
i whould like to ask you some questions :
how have you managed to check the emmc with hard disk sentinel ?
wich command are you using in the efi shell to check the boot sector ?
thank you
LikeLike
I have a copy of the Portable edition of Hard Disk Sentinel that I opened inside the Windows Setup environment that I’ve placed alongside the Windows setup files on a USB drive. At the initial “Install Windows” screen, press Shift+F10 to bring up a command prompt. Navigate through the command prompt to open HDS – or you can cheat by using Notepad’s Open dialog while selecting “All Files (*.*)”, right-clicking HDSentinel.exe and selecting “Run as administrator”. Many (32-bit) Portable edition apps can be run this way in Windows Setup, as it’s simply a customized instance of WinPE (Windows Preinstallation Environment).
The EFI Shell command to read the boot sector of the eMMC is:
dblk blk0Regards,
Jason
LikeLike
So any updates on RAM upgrade? Was it successful?
LikeLike
The RAM upgrade was successful – I just haven’t written the blog post yet.
LikeLike
I’m also interested, please write about RAM upgrade! THX!
LikeLike
hello jason
instead of soldering a new emmc chip , do you think that using an sd whould work ?
the pinout seems to be similar
thank you
LikeLike
It depends on whether the eMMC interface supports 3.3 volt signalling instead of 1.8 volts, AND the host system must support SD commands and not just MMC. Another commenter said they tried this sort of mod but weren’t unsuccessful.
LikeLike
Nice hacking, I have a dead eMMC also may give it a go. Where do you get the eMMC chips at resonable price? Mine has the 16GB like yours but if the 128GB will go for a fair price I’ll do it.
LikeLike
For a reasonably priced 128GB? Honestly I’ve yet to find such a thing – my 128GB eMMCs I’ve had were around $70 USD each from AliExpress, and I’ve already bricked one of my Samsung chips during experimentation.
LikeLike
Can you please tell me wich 64- 128gb samsung emmc you used ? I want to replace one from asus t100ta. It has a failed 32gb skhynix . Thank you
LikeLike
I’m interested on RAM upgrade. Waiting post!
LikeLike
i have iball slide i701 (windows based tablet) and when i deploy a windows .wim image on this tab then emmc of this tablet corrupt and i face same problem as you face . my drive only show 7.2 gb and not writable but before this corruption i have 14.4 gb of space in my emmc. i thought that reprogramming using easy jtag solve my issue , what you think?
LikeLike
JTAG reprogramming won’t help if the eMMC firmware is corrupted. Even if the eMMC part itself had a JTAG port you would still have to desolder it to access those test pads (almost certainly it won’t, only raw NAND I/O), and have a working firmware to flash from the manufacturer.
Unfortunately the only viable solution is to replace the eMMC. At least 32 GB parts are relatively cheap but even 64 GB ones are available for around $30 USD (larger capacity means no need for WIMBoot and therefore have higher performance).
LikeLike
I don’t understand…
According to the datasheet, Foresee NCEMBS99-16G, which you replaced, has BGA 169 package. But, Samsung KLMBG4GEND-B031 has BGA 153 package!
How is that possible?
LikeLike
The outer 16 balls are electrically unconnected and exist only to provide mechanical support for the larger BGA169 packages. BGA153 doesn’t need these.
LikeLike
So, you wanna say, that pinouts of these two packages are identical? I wanted to replace eMMC of my old, but good-working, tablet with a faster and larger one. Its package is BGA 169. But, I haven’t found BGA 169 eMMCs for that which are fast and cheap enough!
I like Samsung eMMCs, but they are mostly BGA 153.
So, it is very interesting to me, if is it possible to replace tablet’s BGA 169 eMMC with BGA 153 one?
LikeLike
Yes, as long as it’s an x86-based tablet. Oftentimes ARM-based tablets store their firmware on the eMMC boot partition which makes the repair harder without access to an eMMC socket.
LikeLike
Have you had any issues with pin alignment during soldering? I wonder, do I need any special actions to solder BGA 153 chip on BGA 169 plate? Like, align the chip in some special way or something… Or, the soldering has no difference with a regular soldering?
LikeLike
The fine ball pitch means you will need to be sure the alignment is exactly right (the BGA pinout has an index that indicates pin 1, and the top of the package will have a corresponding marker as well). As with any BGA soldering technique that isn’t deadbug-style, you will need to reflow with something like hot air. Use a liberal amount of tacky flux on the underside. Look up some tutorials to see how it’s done, but you may want to try reflowing other surface-mount chips for practice first (preferably some scrap boards just to get the hang of it).
The BGA153 basically sits right in the center of the BGA169 footprint. Most devices that use eMMC will have silkscreen corresponding to multiple different sizes including the most common BGA153 11.5x13mm footprint.
This is one of my eMMC-based USB drives that I built, and you can see how the BGA153 fits in the BGA169 footprint; notice the metallic triangle index mark on the PCB, and the index marker on the eMMC itself.
LikeLike
Puedes enviarme un backup de la bios bin, por accidente cambie la configuracion del usb y ahora no me reconose nada.
[TRANSLATION: You can send me a backup of the bios bin, accidentally change the usb configuration and now I do not recognize anything.]
LikeLike
Hi Nicolas,
Here is the BIOS .bin file: https://www.dropbox.com/s/a7icgoyfeve5qd0/tablet%20w86gzbmt01.BIN?dl=0
LikeLike
muchas gracias
LikeLike
Pingback: Ramble: 2018 in review | Rip It Apart – Jason's electronics blog-thingy
I keep checking back to see if you might post info on the memory upgrade bios hack. Is it still in your todo list?
LikeLike
Admittedly, it’s wound up on the back burner alongside a plethora of other interesting projects, including a newer Atom-based computer that has gotten a similar treatment with its eMMC storage. Hopefully those blog posts get written up to my satisfaction and published soon enough.
LikeLike
I am still holding out and checking up every now and then. I did the memory upgrade about 2 years ago. I never got the memory to be recognized by teh OS though. I am hoping you might some day provide your secret.
LikeLike
Hey, I have a tablet with the same specs with a fried eMMC (Forsee NCEMAH59-16G). I am not good with hardware though I am planning to replace the eMMC on my own. I just want to know, if it’d only require hot air treatment or is there any kind of soldering involved?
LikeLike
Use hot air to remove the eMMC, and a bit of treatment with (leaded) solder and solder wick to clean up the pads. The replacement eMMC can then be hot-air reflowed to the board with the help of some flux, and if you don’t have access to reballing tools/supplies you only get one shot.
That said, this is very fine-pitch BGA work (~0.3mm spacing between balls) and isn’t very forgiving if you do something wrong. The chip and board needs to be heated evenly and the balls need to be precisely aligned to the PCB’s pads.
LikeLike
Thanks for the quick reply. I was hoping to do it on my own. I guess wouldn’t be smart. BTW, after the eMMC has been placed or before that does it require additional firmware installation, etc. like Android or just place it in properly and get to Windows installation?
LikeLike
I am asking if something like UFI box would be required for this.
LikeLike
Once it’s soldered correctly, it’s ready to have an OS installed on it; no firmware updating with software or an external programmer is necessary.
LikeLike
Thanks a lot again. Two questions more and then I’ll be done. Does 64/128GB eMMC work well on the 1GB RAM?
Will the internal SD Card reader (not eMMC slot) support U3 Cards or is just a slow 2.0 card reader. I have tried finding this info. without any luck.
LikeLike
It ran “fine” with just 1GB of RAM. The extra storage capacity doesn’t hamper performance (as long as the eMMC is fast enough with writes for when things get written to the pagefile – eMMC 5.0 or better tends to have better random IOPS). Before I upgraded the RAM, I made the pagefile more generous in size but I didn’t quantify if it really made a difference or not.
The internal slot isn’t USB but is native SD/MMC. Unfortunately on the Z3735F and similar SoCs, they’re limited to 25MB/s.
LikeLike
Thanks a lot for the insight. I am gonna try and this and let you know how it goes.
LikeLike
Hey, I am looking for cheap alternatives and I came over a generic SDINADF4-64G. Will the tablet support EMMC5.1 since the chip claims to be a 5.1?
LikeLike
The tablet’s eMMC host interface is only v4.5, so it’s limited to 200MB/s maximum transfer speed. It should work without issue as the spec is designed to be highly forward and backward compatible.
LikeLike
Hey Jason, you have been great help, man. I appreciate it a lot. I need your opinion on one last thing. I have a guy who’d do the replacement for me though he isn’t an expert while finding a replacement emmc.
My faulty EMMC is a Foresee NCEMAH59-16G (https://www.aliexpress.com/i/32997464540.html). I haven’t been able to find a lot of info about it though I know it’s a 153 ball EMMC (I am guessing that’s what BGA153 also means). I have been specifically searching for “153 ball emmc” to look for a replacement and came over the following:-
https://www.aliexpress.com/item/4000633071071.html (64GB)
https://www.aliexpress.com/item/4000067828081.html (64GB)
https://www.aliexpress.com/item/4000822448777.html (32GB)
Would these work? Or should I be looking for anything in the specs other than the card being a 153 ball.
Moreover, the technician says it’s 50% chance that the replacement would work, he’s probably worried about the misalignment as you’ve already mentioned. Any tips for him?
LikeLike
All of those would work but some may work better than others.
The first and third listings (the SDIN8DE4-64G and H26M64001EMR) are eMMC 4.5, so it’s possible that their 4K write IOPS won’t be as good as the second (SDINADF4-64G, which is eMMC 5.1). However, the SDINADF4-64G uses planar TLC NAND but with an SLC cache, unlike the others that use planar MLC (but realistically this won’t prove to be a performance bottleneck). Out of those three, I’d recommend the SDINADF4-64G.
One hint for more precise placement is to use an Xacto knife or similar to lightly scratch an outline of the chip onto the board. That way it’ll be easier to see exactly where the chip needs to be to ensure better alignment.
LikeLike
Thank you again, Jason. I am gonna go for the second one then and will let you know how it goes. I’ll let the technician know about the xacto knife tip.
LikeLike
Dang, that memory upgrade sure sounds interesting. Really hope that some sort of barebones post about it is still in the pipeline. :S
LikeLike
i know i’m almost 4 years late to the party but id like to ask on how’s the memory upgrade done, i know some of these tablets only have pads for 2 memory chips and it makes me wonder if you found a 8Gb chip for these and used that or this tablet has another unpopulated set that you fill up with 2x512mb chips to make it 2GB
LikeLike
After soldering the replacement chips in, it’s necessary to modify the UEFI MemoryConfig NVRAM variable. I ultimately ended up using UEFITool to copy the entire NVRAM partition from a BIOS image from a different brand tablet based on similar hardware and the same amount of RAM in order to accomplish that, as I don’t have our know of the tools to create a new variable from scratch.
I didn’t end up trying 8Gb/1GB chips as they proved to be far too expensive for my liking.
LikeLike
I know this is an old topic, but still.
i have one of those atom boxes, that came with winodws&android preinstalled. The integraded foresee emmc failed (shows readonly 7,22GBs). Now i can boot windows just fine via usb stick, but i’d like to use SD slot, since it’s there and will leave me one free usb port (device only has two).
Any chance of hacking those UEFI firmwares to include sd card boot?
LikeLike
If there is, unfortunately I’m not the one who can pull such a feat off.
LikeLike
I just stumbled upon your site and you have some really cool projects. I am particularly interested in this Intel Atom Z3735F tablet, I have a very similar Intel Atom Z3735G device that I recently pulled out of a closet and upgraded to Win10. I have been fumbling around to see if I can get it to run Win11 but I am stuck due to the UEFI being 32bit. I would love to see your notes on upgrading the ram. If I ever find a hack to get the UEFI to x64 I would gladly spend the time to upgrade the ram, EMMC, and Bios to upgrade to Win11.
LikeLike
Can you please tell me wich 64- 128gb samsung emmc you used ? I want to replace one from asus t100ta. It has a failed 32gb skhynix . Thank you
LikeLike
The specific 128GB one I used was the Samsung KLMDG8JENB-B041, but any eMMC 5.1 in a 11.5x13mm package from other vendors like SanDisk or Toshiba/Kioxia should work. Be aware you may have to deal with some epoxy or other adhesive holding the chip to the board.
LikeLike
Thank you very much fot your help
LikeLike
I usually work on a lot of electronics, I will use solder mask to secure it in place . Thanks for the advice
LikeLike
Hi sorry for bothering, I wanted to ask another question. I have a samsung galaxy s7 edge and it apears to have some samsung UFS module H28U64222MMR and it has the same pinout as eMMC , i was wondering if it will work ? To thank you
LikeLike
Unfortunately, no. The package looks the same at a glance, but the interface and pinouts are dramatically different.
LikeLike
Hi, Jason.
I have the same problem with my tablet and no skills to solve it.
Do you know if it’s possible for me to still use my tablet(or its display) as a second screen on my PC?
LikeLike
There are apps that let you turn a second computer into a second monitor, but without the ability to store an operating system, probably not. As for the display itself, you might be able to find an HDMI or DisplayPort to MIPI-DSI or LVDS converter board but it wouldn’t be a universal solution.
LikeLike
hello thanks for the guode but im in need of the bios. i changed a single setring in bios now my tablet wont power on.. please may i have bios dump (spi dump) to revive this tablet. o searched the whole internet but i cant fimd the bios rom
LikeLike
Here’s a Dropbox link to the BIOS image: https://www.dropbox.com/s/a7icgoyfeve5qd0/tablet%20w86gzbmt01.BIN?dl=0
LikeLike
I read your trick and it is nice to see tablet like this can be repaired.
I have “Lark Ultimate 7i WIN” that was running Win10 32bit.
Motherboard is (INET -i7L), It has 2x kingston chips (D2516EC4BXGGB) by 4Gb but CPU is Z3735G (1GB only)
https://wiki.archlinux.org/title/Lark_Ultimate_7i_WIN#Touchscreen
Tablet was mostly used for light browsing and defragging my HDDs over usb adapter.
Sadly in November 2022 i experienced that Win10 sometimes fail to boot and require recovery USB to fix boot issues. (dead sector warning sign maybe?)
Today tablet freeze in win boot logo and after restart it just show EFI shell without any FS records.
Only what i see are empty BLK0—BLK2 Pci root address.
I guess that Foresee 16GB chip become dead part of tablet.
I know this as i disassemble tablet found (Foresee NCEMBS99-16G) chip and try searching google about (Dead Foresee emmc) and google get me this article that you have similar tablet.
I read that you replace yours faulty with 32gb Samsung one but i cannot find it on ebay anymore.
What type of emmc you used for 64gb-128gb?
Regards
LikeLike
Personally I used Toshiba eMMC 5.0/5.1 chips, a 64GB THGBMFG9C4LBAIR then a 128GB THGBMHT0C8LBAIG. Other brands of eMMC chips should work fine though.
LikeLike