As seen on Hackaday!
Oh no, I’ve done it again haven’t I?
TL;DR: Just because a device runs Windows CE doesn’t mean it’ll just run Doom without much work.
About a week ago I was perusing some local garage sales, and stumbled upon an old GPS receiver – the Magellan RoadMate 1412. Magellan units are known to run Windows CE, so naturally I had to purchase it and do what needed to be done: run Doom on it. After shelling out $10 CAD for the receiver and its slightly-damaged car charging cord (no mounting bracket, though), it was time to take it home, clean it up, and send it to its Doom… (heh, get it? … I’ll see myself out.)

The Magellan RoadMate 1412 running Doom! It wasn’t nearly as easy as I first thought…
Considering that the device runs Windows CE 5.0, I figured that running Doom on it would be a piece of cake once I gain access to the underlying operating system. Should be pretty straightforward… right?
Wrong! Feel free to join me in my adventures in running Doom on a (perhaps excessively) neutered stripped-down Windows CE device.
Stage 1: Power-Up
Turning on the unit wasn’t particularly exciting, although I expected the unit to not work until the internal battery received at least some charge. However, within seconds of me connecting the car charger to it, it powered on with the Magellan logo and a progress bar, before transitioning to the boot logo and the usual “don’t crash your car” warnings that GPS units tend to display on power-up.
-

- Magellan RoadMate 1412 starting up.
-

- Splash screen displayed after boot progress bar.
-
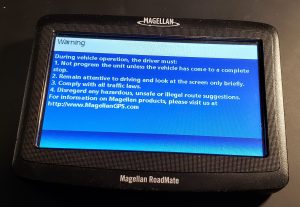
- Legal notice before navigation app starts.
Unsurprisingly, the unit still works as a GPS unit, and there’s no immediately apparent way to exit the navigation app and slip out into Windows CE itself. However, after some searching, I found out that plugging in the unit causes it to appear on a computer as a USB drive, with the navigation app’s files all visible as a FAT32-formatted 2-gigabyte volume.
-

- The Magellan RoadMate 1412 in USB mode.
-
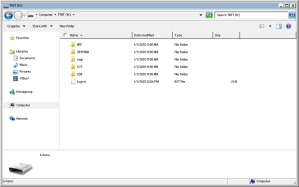
- The Magellan RoadMate 1412 file structure.
-
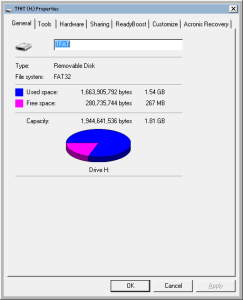
- The Magellan RoadMate 1412 file system properties.
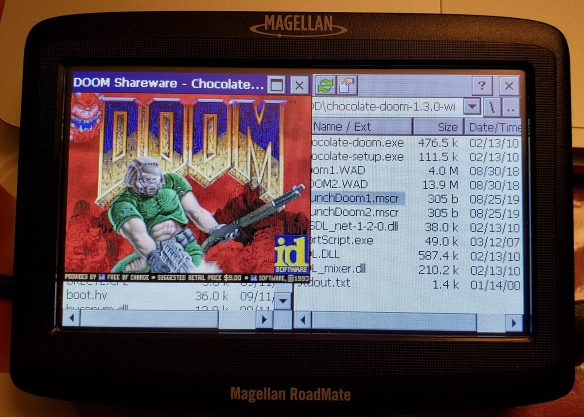
Stage 2: Not-so-Total Command
The navigation app’s files are stored in the “APP” directory, with the executables “Navigator.exe” and “mgnShell.exe” catching my eye in particular. I renamed the Navigator app to “MagNavigator.exe” as to allow a relatively easy revert in case things go wrong, and I copied TotalCommander/CE to replace the original navigation app. Rebooting the receiver didn’t appear to change anything until I dismissed the initial legal warning. Once I closed the notice, I was sent right into TotalCommander/CE, but with no taskbar in sight.
-

- TotalCommander/CE launched instead of the navigation app.
-

- No taskbar, and no .NET Compact Framework either…
One strange thing I noticed was a distinct lack of icons in the folder list. Scrolling through the “\Windows\” directory revealed some rather disappointing revelations: we have no command prompt, on-screen keyboard, or Explorer shell (therefore, no desktop, Start menu or taskbar).
This meant that running Doom wouldn’t be nearly as easy as it was when I got it running on my Keysight DSOX1102G oscilloscope, as that device still had a (mostly) full Explorer shell and command prompt. Windows .lnk shortcuts failed to work either, causing TotalCommander to just redirect to the system root directory – and forget trying to use batch files! The Explorer components are so absent, third-party apps can’t even display Open or Save dialogs…
This presented a significant roadblock: Chocolate Doom for Windows CE requires command-line arguments. How am I supposed to run this with no Explorer shell or command prompt?!
Stage 3: Getting (Mort)Scripty
Without access to native Windows CE tools, I needed to find a third-party solution to run programs with command-line arguments – maybe some sort of scripting engine.
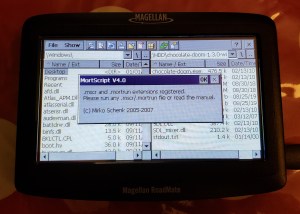
Enter MortScript. It’s a lightweight yet powerful scripting engine, with a Visual Basic-like syntax. It’s instrumental in making GPS mods like MioPocket possible. (On that note, before this point I wasn’t even aware that MioPocket even existed; I learned that it provides a lot of Windows CE functionality that’s otherwise absent on GPS units like mine, but I’ve come this far – I was determined to forge my own path to Doom.)
-
- Mortscript registering file extensions upon first run.
-

- Testing out MortScript for the first time.
I tinkered with the example command syntax and used its Run() command to send the correct command-line arguments for Chocolate Doom: “chocolate-doom.exe -iwad [wad path]“. After running MortScript for the first time to register the .mscr file extension, I was ready to make my script:
# LaunchDoom1.mscr
#########################################
# Chocolate Doom for Windows CE Startup Script by Jason Gin
# Visit: https://ripitapart.com
# Version 1.0 (initial release)
#########################################

# Resource Paths (WAD and executable)
DoomWadPath = "\SDMMC\Fun\chocolate-doom-1.3.0-wince\Doom1.wad"
DoomExePath = "\SDMMC\Fun\chocolate-doom-1.3.0-wince\chocolate-doom.exe"

#########################################

# Step 1: Create required command-line arguments to start Doom:
DoomExeArgs = "-iwad " & DoomWadPath

# Step 2: Run Doom!
# Error checking is performed on whether the WAD file path is valid.
# This assumes that the executable path is valid.
# If it isn't, then nothing happens anyway.

If (FileExists(DoomWadPath))
Run(DoomExePath,DoomExeArgs)
Else
Message ("Error: Unable to find the WAD file at " & DoomWadPath & "!")
EndIf
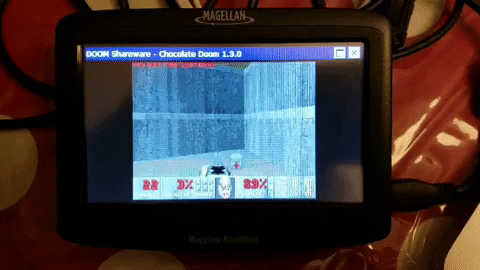
Stage 4: Doom’d!
After running the script, I declared success: it runs Doom! The window was limited to its lowest supported resolution of 256×200, but running “chocolate-setup.exe” I was able to set it to 320×240 – not great, not terrible. Oh, and it also runs Duke Nukem 3D.
-
- It runs Doom!
-

- It also runs Duke Nukem 3D!
Unlike my previous Doom hack, I wanted to make the window fill the screen but not be in full-screen mode (without any physical buttons, I would otherwise be unable to regain control of the operating system). After some tinkering with the configuration files stored in “\My Documents\.chocolate-doom\chocolate-doom.cfg“, I changed the following settings:
autoadjust_video_settings     0
fullscreen                    0
aspect_ratio_correct          1
screen_width                  480
screen_height                 247
With this adjustment saved, I was able to get a more immersive Doom experience on my GPS receiver.
Magellan RoadMate 1412 Runs Doom
Extras
I wanted to see if I could get an external keyboard working on the receiver so I can actually play Doom instead of just letting the on-screen demo do its thing, so I rigged up a mini-USB On-The-Go (USB OTG) cord with a homemade USB B-to-A adapter so I can plug in USB peripherals to the charging port. Unfortunately, it seems that the receiver only supports USB drives, and refuses to work with USB input devices (like mice and keyboards); it doesn’t even work with USB hubs! Oh well, it was worth a try.
-

- DIY adapter to get a USB host port.
Conclusion
As is with many things in life, projects are often much more complicated than it might seem. Just because a certain device runs Windows CE doesn’t mean that all the of the expected components are actually available (after all, it is meant to be a highly modular embedded operating system). However, with the right tools, it can be done – and it keeps the adage of “It Runs Doom!” alive.

Again, amazing. I love your DOOM hacks.
LikeLike
What would be nice is a universal WinCE 5 installer to put a full install on old GPS devices, especially Garmin. I have a few old off brans ones like a RightWay RW200 and a PC Miler PCM430.
On the RightWay I go to poking around with MioPocket and GPSMenu PEZ and found an app that was in some Asian language, with two buttons. I poked the wrong button and deleted the onboard maps and Co-Pilot software. Fortunately I was able to install iGo 8 and compatible maps into the vacated space. But there’s still something hidden, I can’t see where the media player, photo viewer, and text file reader are stashed.
On the PC Miler unit, the directories where the navigation app and maps are, are corrupted. Like with the RightWay the built in shell allows redirecting the navigation app launch to any WinCE executable. Explorer will not delete the corrupted directories. Like regular Windows the stupid thing hugs and protects corrupted folders and files instead of offering to get rid of them. If there was a program like Unlocker for WinCE they could be deleted.
Before Unlocker, the only way to remove some corrupted folders from Windows was to reformat the drive because Explorer would not allow their deletion and none of the ways of running scandisk would fix or remove them. It would just stop upon hitting the corrupt folder and leave the volume marked ‘dirty’ so it’d want to scan again the next boot.
That’s what I have on the PC Miler GPS, only without any scandisk. Since the owners of the PC Miler name no longer sell GPS devices, they’re no help.
LikeLike
Pingback: Cómo ejecutar DOOM en un GPS con Windows CE
Pingback: Running Doom on an Old GPS Receiver | iotosphere - Internet of Things
Pingback: Ramble: 2019 in Review | Rip It Apart – Jason's electronics blog-thingy
Pingback: Cómo ejecutar DOOM en un GPS con Windows CE - NeoTeo
I have a project i need hekp with. Its a knight rider gps and i would like to get it working again with possibly updating the maps. Can someone help me?
LikeLike
Hi, I’m trying to replicate this project with an old Magellan GPS from 2008- I’m not sure what to do with the cab files of Total Commander CE edition. I have all these files with sequential extensions (x.000, x.001, x.002 etc) and I can’t figure out how to get an executable from it. Cab files are new to me so if I’m being ignorant I apologize- Any help is much appreciated!
Thanks,
James
LikeLike
The .CAB file is supposed to be opened by Windows CE as a kind of installer package. Granted, without another more capable WinCE device with a GUI shell, that could be an issue.
It’s been a while since I’ve visited the project, but I’ll look into seeing if I can have the archive extracted into a form that can be directly copied to an SD card.
LikeLike
Thanks for the quick response! Certainly let me know if you find the files kicking around- it’d be much appreciated. not the end of the world if not, though. Just toying around with old junk
LikeLike
I did some reinvestigation and figured out how I managed to extract the files.
The .CAB file itself contains those numeric-extension files you mentioned. The
CECMDA~1.000file describes what the other files are renamed to as well as vendor information for a formal install, and it is possible to work out what the file names should be after sifting through the binary data and searching for text strings.The
CECMD_~2.001file renames tocecmd.htm,000cecmd.002tocecmd.exe,00000ftp.003toftp.tfx,registry.004toregistry.tfx, and00000LAN.005toLAN.tfx.Renaming the files and keeping them together in a folder should be enough to let the program run.
LikeLike
I have a magellan 1200 and i whould like to install windows ce 5.0 on it, however i cant get windows 11 to recognise it, i have tried many apps but none of them work, could you please help me?
LikeLike
No apps will work if it doesn’t get recognized by a computer. You’re using a standard USB-A to USB mini-B cable?
LikeLike
Hi, there:
I have several WinCE Magellan GPSes, and I was wondering how you managed to get USB OTG to work. It would be extremely helpful if you could tell me how you did it so I can replicate it. USB OTG is the only thing I am missing my Magellans. (I have some that do not have microSD slots, making it hard to transfer files, as it is a pain to constantly have to disable my modded startup script (using iBoot.exe), and it would be really nice to be able to transfer files quite easily.) I do have access to soldering tools, and I can use them quit well. Feel free to email me in response!
Thanks!
LikeLike
I haven’t revisited it since, but I got USB OTG working with a standard mini-USB OTG dongle (using a micro-USB OTG dongle with a micro-B to mini-B probably won’t work). Or, if you have one around, a TI-84 calculator-to-calculator cable (mini-A to mini-B).
LikeLike
Did you have to set certain registry values in order to get it to work? Also, would you have any more descriptive pictures than the one in your post about USB-OTG that you could show me of yours?
I do have a mini-USB B to USB-A OTG Dongle, but I have already tried it, and it does not work. Could you explain more of what you meant? ( I do have a TI-84 calculator, but I am missing the cord.)
Thanks!
LikeLike
I don’t remember needing to set any Registry values for it, as it’s been a long while since I’ve done this. I could be wrong, but vaguely remember needing to use an OTG cable to short the ID pin to ground, but still having to supply external 5V power to run the USB peripheral as well as the navigator itself.
LikeLike
OK, I did have an inkling about needing to externally power it, but I did not think of shorting the ID pin to the ground. I would like to try it, but how to do so in a way that does not involve manually soldering two different cables together?
LikeLike
Without soldering a custom cable, probably breakout board shenanigans, like those plugs/sockets you can find on Amazon/AliExpress that break out the plugs into screw terminals or something.
LikeLike
Never mind. I would prefer the cheapest option available, (even if that means soldering cables). I do have several (4 to be exact) mini-USB B cables for my Magellan, a breadboard, and an Arduino (for power). The cables themselves are pretty good, but I would doubt that exposing the mini-USB B connector would do much good, as I doubt that there is an unsoldered ID pin just waiting to be shorted to the ground, like on the micro-USB B for example.
How could I do it in a way to make it nice and portable? (It could get annoying to carry an Arduino-breadboard-cable combination around. If I need to, I can leave it in one spot, but it would be nice to carry my GPS around with me while i am using it–(like yours was…?). )
Anyhow, thanks!
LikeLike
You probably don’t even need the Arduino-esque kludgy setup. If you can find or get a premade mini-USB OTG dongle (mini-A plug to regular A receptacle), you could just cut the cord to wire up 5V external power to the VBUS/GND lines. Throw some heat-shrink tubing or electrical tape wrapping and call it a day.
LikeLike
Where do I find the VBUS and Ground lines? Do I have to take apart my Magellan order to solder it? (Also, are the pinouts of the VBUS/GND very small, so I will need to use solder paste?)
Thanks!
LikeLike
I’d recommend modifying the cables themselves, so you’re just soldering up wires; red is VBUS, white is DM, green is DP, and ground is often black or uninsulated and used as part of the shielding, and won’t need disassembly of your GPS unit.
LikeLike
(Continuing previous OTG Topic, as it won’t let me click reply on your old one.)
Then how do I short the ID pin to the ground? There is no separate wire soldered to the ID pin in most, (if not all), miniUSB B cables!
Could you please explain more?
Thanks!
LikeLike
That’s why you need the mini-A plug rather than mini-B. Those will short the ID pin to ground to activate host mode.
LikeLike
Ohh…! To clarify, you are saying to use a mini-A connector. I don’t think I have one of those cables, sadly. I only have several mini-USB B cables. I found a PDF here that specifies the differences between mini-A and mini-B:
Wayback Machine
Will a mini-A even fit in the USB port of my GPS? Also, Could you maybe find a link (Amazon, AliExpress, whatever…) to the type of cable you are suggesting? (As I am finding it a little difficult to invision the type of cable you mean.)
Thanks!
LikeLike
Mini-A and B are different in shape, but the port on my Magellan unit can take both. Both the mini A and B plugs have the same ID pin so it looks like commercially available adapters just use the cheaper mini B connector but use the same ID pin trick to make the plug trigger the USB port into assuming host mode.
Here’s an Amazon link for a 2-pack. You’ll still need to chop the cable in half and add in another regular USB cord for power to make the adapter, but this is the more important part of the setup anyway: https://www.amazon.com/SaiTech-Pack-Cable-Digital-Cameras/dp/B00VWUTJ22
LikeLike
Amazing, thank you. Iwill check it out and let you know how it works.
Merry Christmas!
LikeLike
Also, did the GPS power the USB itself, or did you have to hook up external power as well?
LikeLike